
Setting up this blog with Jekyll on AWS S3
- 6 minsWhy I chose Jekyll for this site…
At work, I’m increasingly more involved with leadership and increasingly less involved with implementing the technical work with my own hands, so it made sense to build my own playground that can be used to keep my technical edge.
I wanted to concentrate on the content, and use this site, and the technologies that will support it, as my way of experimenting with AWS and other cloud and web technologies.
Jekyll - a parsing engine that can build static websites from markdown - will allow me to use markup to write my musings and instructionals, and provide an easy mechanism to convert the markup to HTML that can be deployed to any hosting provider.
I chose the clean Indigo template provided by @koppliin (obrigado, colega!) so I didn’t have to come up with my own front-end setup. I’m not a front-end developer, and it certainly would have detracted from my goal if I had to dive into all that.
I thought about having my posts in a database, and applying the markup translation on the fly. While that would have presented some opportunities to look into the AWS functionality for databases and for processing requests, it might be diving too deep, too soon. It may still be something I decide to do in the future.
Why I’m using AWS S3 for this site…
Jekyll will essentially generate a set of static files that I can deploy to any hosting provider - so why choose AWS S3?
I’m interested in the AWS ecosystem for a variety of reasons, and it also has the potential to be the cheapest hosting provider available for these static HTML pages.
Setting up Jekyll on my mac
I work on a mac. Most of the below should be applicable to any other OS with some minor tweaks:
Install Jekyll
sudo gem install jekyll
sudo gem install bundler
The commands above will install Jekyll and the bundler. From here, if you want the default templates provided by Jekyll, you’d create a directory to host your project and issue:
jekyll new <yoursite>But I wanted to start from the Indigo template, so I downloaded it to a directory, and issued:
bundle exec jekyll serveFrom here, it is a matter of tweaking the _config.yml, and creating my posts as markup under the _posts directory.
The following should explain a bit of what was created for you:
_config.yml  # The overall settings for the Jekyll site
_includes    # These are the template partial files
_layouts     # These are the actual templates
_posts       # Each file in here will be a blog post. File names should follow a format of YYYY-MM-DD-file-name
_sass        # SASS files
about.md     # This file will turn into about.html
css          # SASS files that will compile to CSS
index.html   # The index document
Setting up AWS for my S3 site
Sign up for an AWS Account, it is free!
Amazon has a very nice white paper for setting a static website on S3 - read it!
Once you sign in for the first time, you will be deposited in your console. And the following useful wizard menu is displayed:
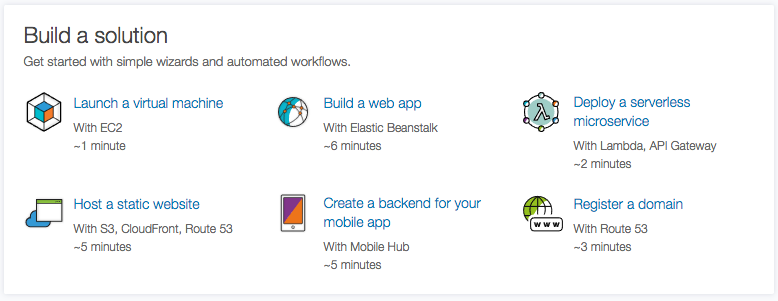
What we are interested in is hosting a static website, so we select that option from the menu. I’ll have a separate post about setting up the AWS account and all the configurations one must go through.
As a mac user, I’ve become addicted to Homebrew. Here is what I us to install the AWS CLI:
brew install awscliIt install some examples and supporting files to:
- Examples: /usr/local/share/awscli/examples
- Bash completion: /usr/local/etc/bash_completion.d
- zsh completion: /usr/local/share/zsh/site-functions
And I proceed to configure the AWS CLI:
aws configureWhich generates a series of requests for input like:
AWS Access Key ID [None]: <Enter your AWS Access Key ID here>
AWS Secret Access Key [None]: <Enter your AWS secret access key here>
Default region name [None]: <Enter your AWS region, like us-east-1>
Default output format [None]: <Enter json or text>
I then connect the aws_completer with the aws command line tool like this:
> echo $SHELL
/bin/bash
> which aws_completer
/usr/local/bin/aws_completer
>complete -C '/usr/local/bin/aws_completer' aws
And I test it by typing:
> aws s3 <tab>
cp        ls        mb        mv        presign   rb        rm        sync      website

> aws s3 ls
2017-03-17 13:55:06 aws-website-somename-xxx2a
Which means I can use the AWS CLI to manipulate data in the cloud! I prefer to use this and build my own shell script that will copy the files to the cloud as needed, but you could use s3_Website as well.
The s3 sync command may give me what I need: I can define file patterns that I don’t want to sync to S3, and I can gather the appropriate content from the _site directory (where the jekyll parser deposits my final HTML) to the cloud.
So, here is my deployment bash script:
#!/bin/bash

# _aws_deploy.sh
# C.E. Lopes 2017
# Syncs a directory to AWS S3 via the AWS CLI (must be pre-installed)
# http://cethegeek.com/jekkyl-blog-aws/ for more info

if [ -z $LOC_CETHEGEEK ]; then
    echo "LOC_CETHEGEEK environment variable isn't set."
    echo "Run this command: export LOC_CETHEGEEK=/Users/celopes/dev/cethegeek-jekyll/cethegeek/_site"
    exit 1
fi

# Builds the static site from the Jekyll config and blog markup
bundle exec jekyll build --incremental

# AWS sync the directory with any new and updated files to S3
command="aws s3 sync $LOC_CETHEGEEK s3://aws-website-cethegeek-rwv2a"
options='--exclude "*.md" --exclude "Gemfile*" --exclude "Rakefile" --exclude "travis.sh"'

if [ -z $1 ]; then
    echo -e "Dryrun of deployment:\n"
    eval "$command $options --dryrun"
elif [ $1 == 'deploy' ]; then
    echo -e "Deploying to production:\n"
    eval "$command $options"
else
    echo "The options for this script are to use no parameters (dryrun) or pass the word deploy as a parameter."
fi
Just running the script will produce a dry-run, showing you all the files that have been created or changed and that are going to be copied over to S3. If you call the script passing the parameter “deploy”, it will actually deploy to production.
So, with that script written, I’m going to remove all files created by the default by the “Host a static website” wizardwhen I created the S3 bucket:
aws s3 rm s3://aws-website-somename-xxx2a --recursiveAnd if all goes well, when I issue the following command, this first blog post will be up on the intertubes:
./aws_deploy.sh deploy…
Well, it didn’t go well. Essentially, referencing the directories created by Jekyll, like the blog directory, that contain the index.html files to be rendered, was failing because of the setup for Cloudfront. I followed the steps in the stackoverflow answer and everything lined up after a refresh of the domain mapping by AWS.

C.E. Lopes
the geek